Cinquo’s measurable QR codes let you get more Google reviews and know exactly who or which spot generated them. In this guide you’ll learn what delegated users are, how to create measurable QR codes by role, how to manage them, how to track their performance, and how to bring them into your store. The best part: any subscription includes unlimited delegated users and digital QR codes
What are delegated users?
A delegated user is anyone on your team you give access to your Cinquo account without making them a manager of your Google Business Profile. You only need their email to invite them, and from the Delegated Users panel you manage your whole team in one place: name, role type, email, assigned locations, and what they can respond to.
This gives you:
- Centralized control: manage all your locations and your entire team from a single panel.
- Security: you don’t expose your Google Business Profile; permissions live inside Cinquo and you can change them whenever you want.
The three available roles
When you create a New Delegated User, you’ll see that each role has different permissions (and you can change it whenever you want):
1. Manager — Cross-functional roles (head office, headquarters, management).
- Can have access to different locations in order to have a global view
- No QR: it doesn’t ask for reviews
2. Staff — Employees at a single location (waiters, reception, floor staff).
- Only has access to one location
- It has its own trackeable personal QR.
3. Solo Insignia — Un QR medible sin login a Cinquo. Puede ir vinculado a un camarero, un dependiente, o a una zona genérica como la caja o la entrada.
3. Badge Only — A measurable QR code with no login. It can be tied to an employee, for tables or generals rooms like the entry or checkoutt.
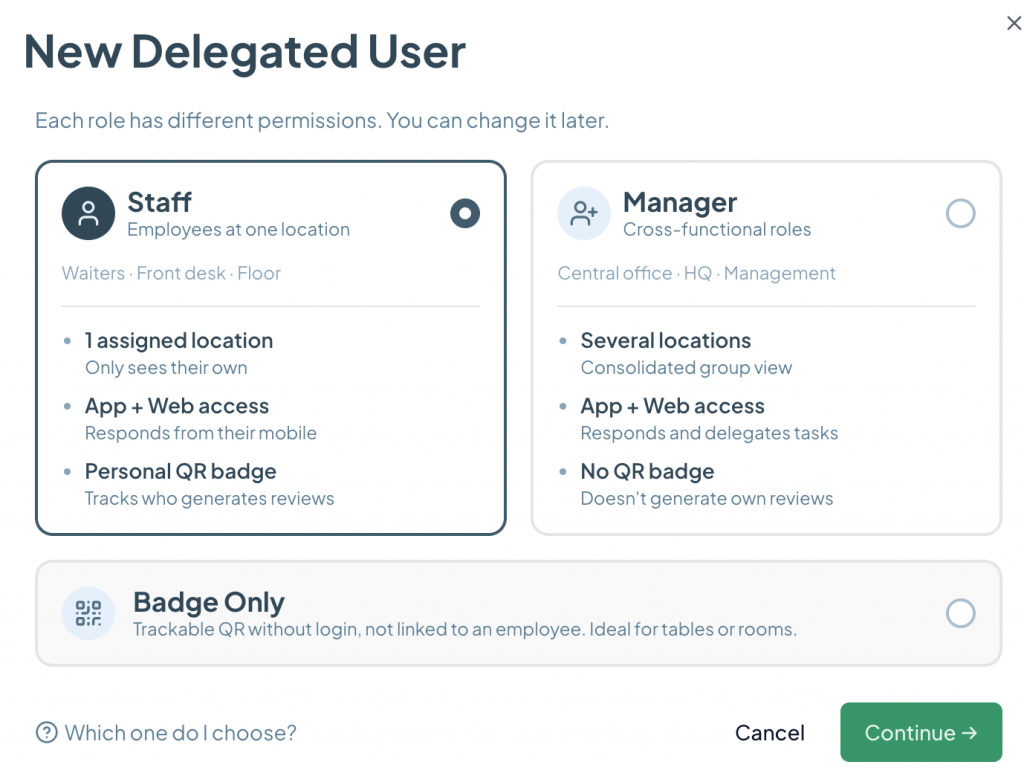
In short: Staff for employees who respond and also have their own QR; Manager for whoever manages multiple locations without a personal QR; and Badge Only when you just want a measurable QR for a physical spot, with no user and no access.
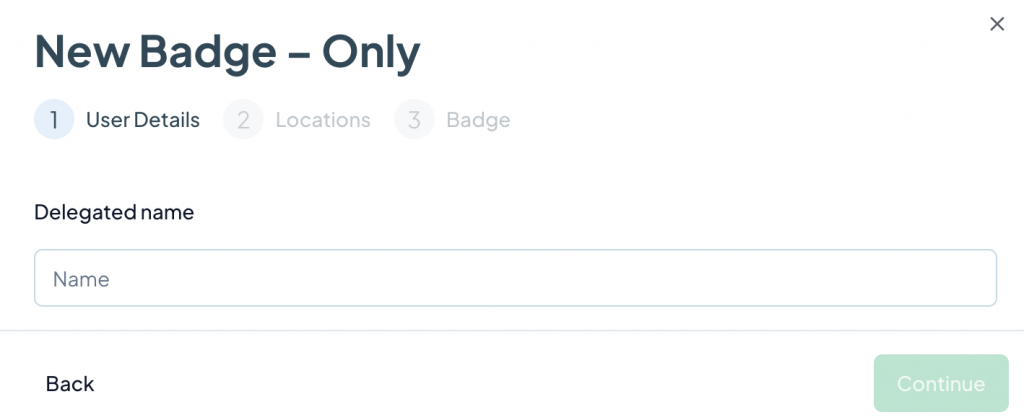
How to create a measurable QR code (example: Badge Only)
Creating one is a 3-step wizard. Let’s use a Badge Only QR as the example:
- Click + New Delegated User.
- Choose the role (Staff, Manager, or Badge Only) and click Continue.
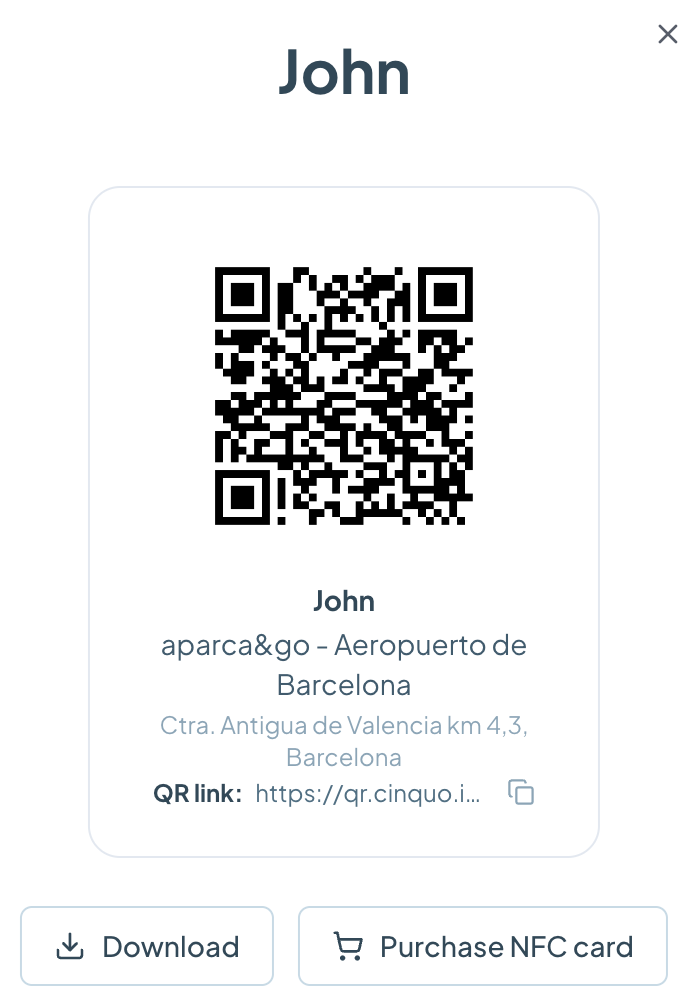
- Step 1 – User details: enter the delegate’s name (for example, “Pablo” or “Table 4”).
- Step 2 – Locations: assign the relevant location or locations.
- Step 3 – Badge: Cinquo generates the QR code.
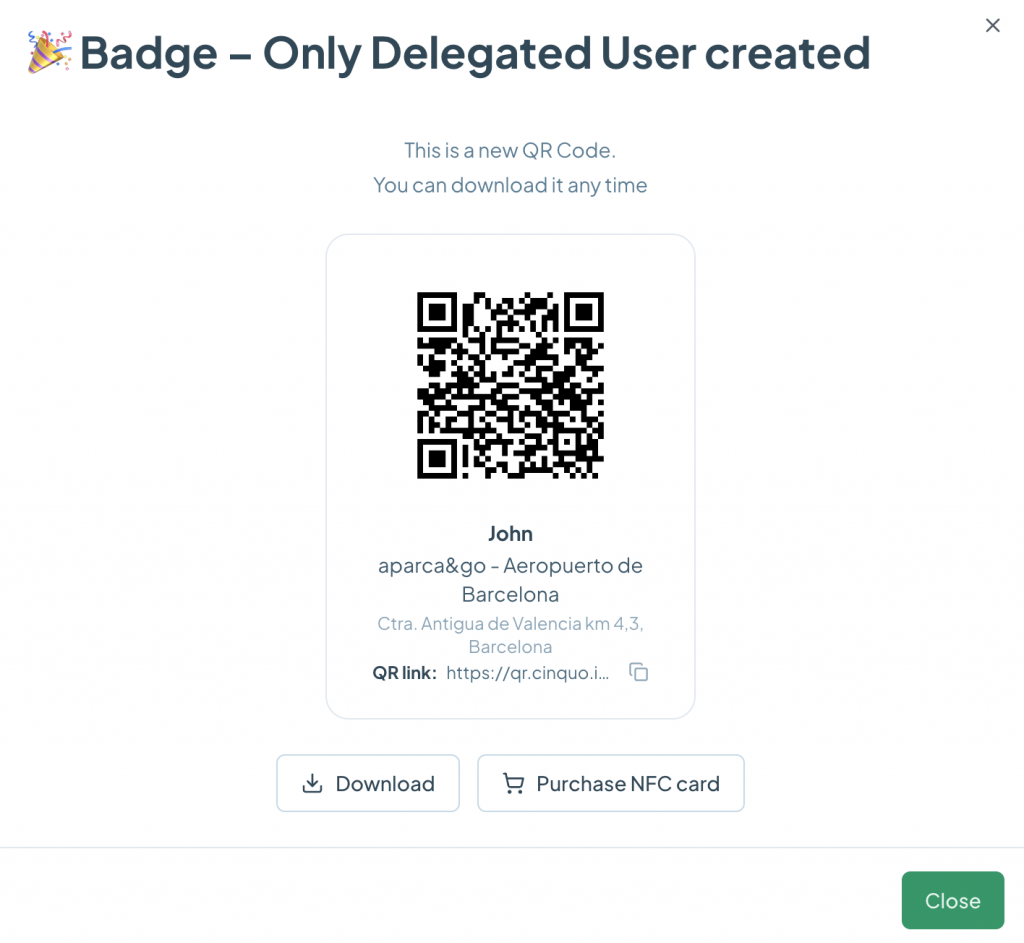
When you’re done, you’ll see the confirmation screen with your new QR code, ready to use and downloadable at any time.
How to bring the QR into your store
On the QR’s final screen you have everything you need:
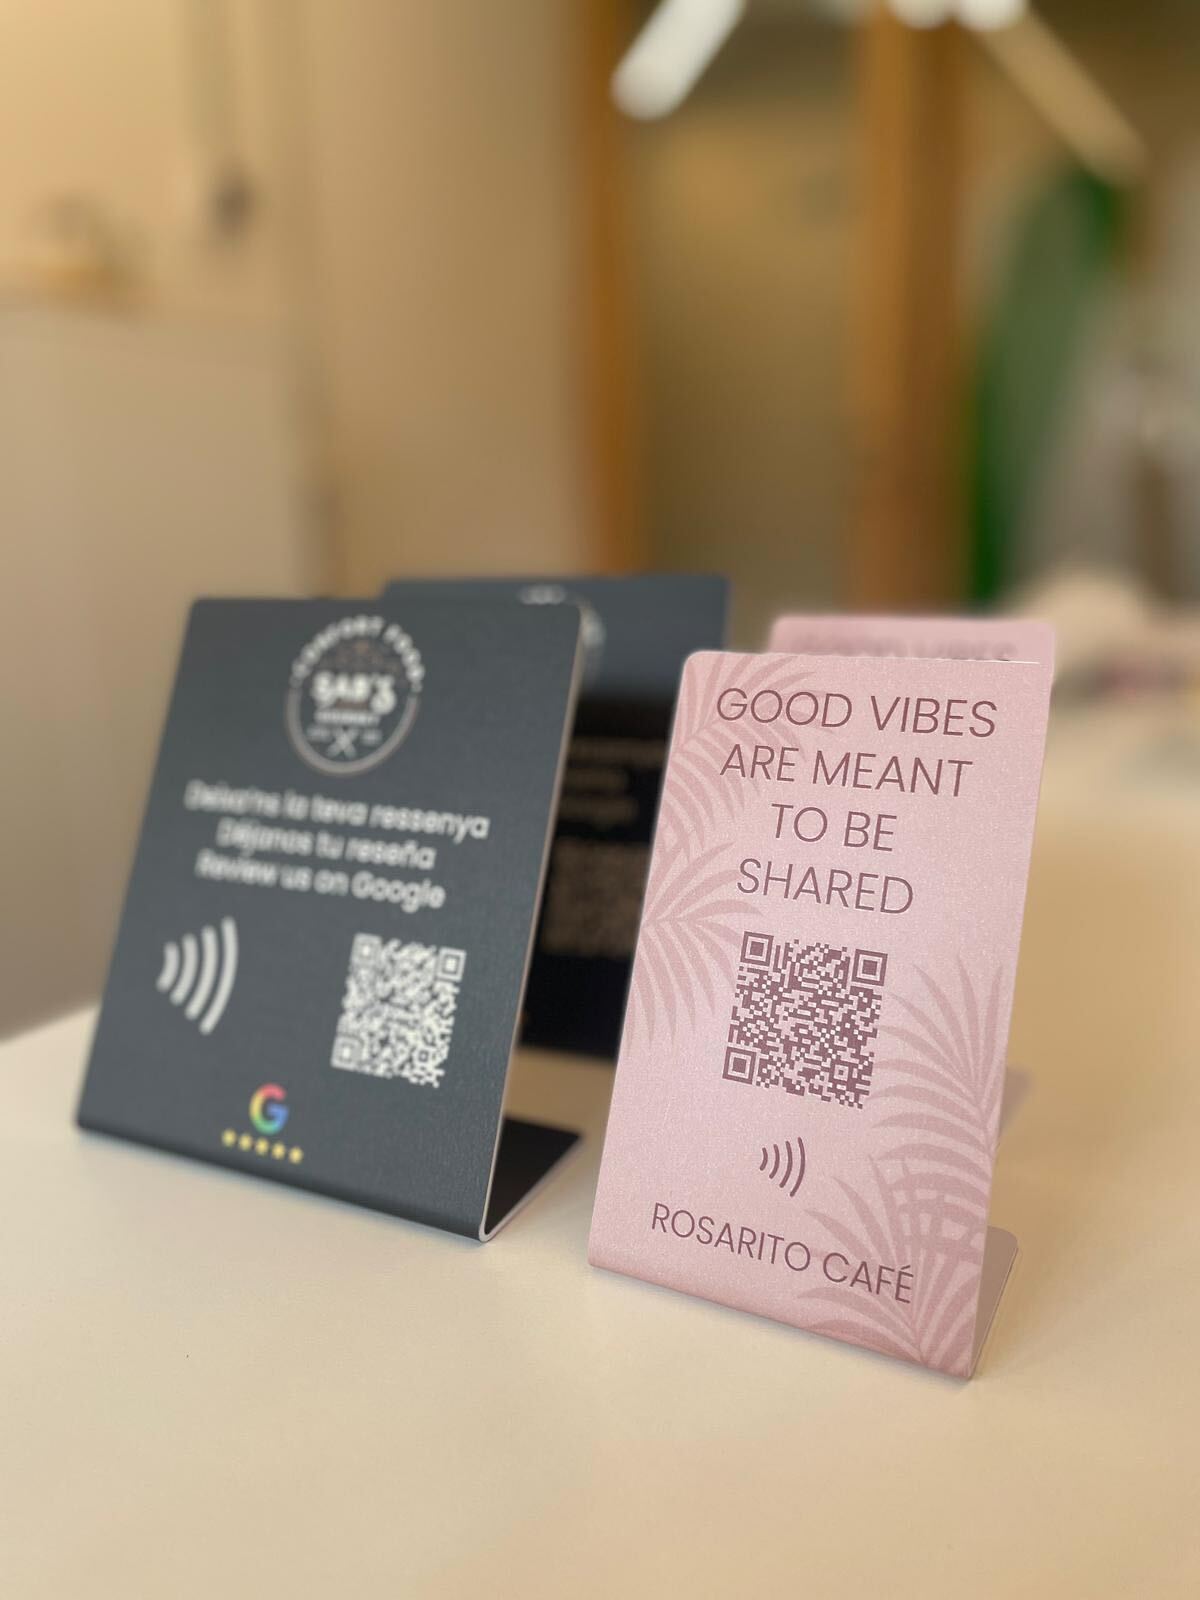
Option 1 — Print the QR
Click Download to save the QR image and print it. Place it on a physical material: poster, table stand, card next to the bill, sticker on the counter or POS. The customer scans it with their phone camera and goes straight to the Google review form.
Option 2 — Use the QR link
Each QR includes a QR link you can copy with the copy icon and reuse anywhere: website, WhatsApp, social media, or a digital material. Same measurable attribution, without depending on the printed image.
Option 3 — NFC card (recommended!)
From the same screen you can Buy an NFC card so the customer just needs to tap their phone. Perfect for the counter or tables.
Best practices at the point of sale:
- Place the QR where there’s a natural moment to ask for the review (when paying, when saying goodbye).
- Pair it with a short line: “How was your experience? Leave us a review”
- Use a different QR per table/area/person to get the most out of tracking, or maybe your employees incentives for positive reviews.
How to manage your QR codes (QR Settings)
From the QR Settings section you get a view of all your QR codes with the key information for each one.
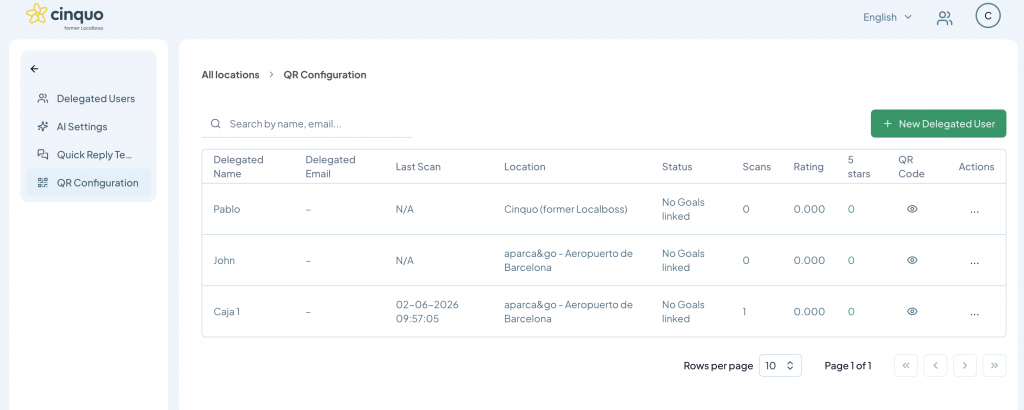
From the Actions column of each QR you can:
Delete: permanently remove the QR when you no longer need it.
Edit: change the name, location, or QR details without having to create it from scratch.
Reset: set the QR back to zero so you can reuse the same physical material (poster, card, stand) with a fresh counter, without reprinting it. Ideal when you reassign a QR to someone else or start a new campaign.
How to track performance (Personal QRs)
The Personal QRs screen is your control panel for measuring and tracking all activity. At the top you have filters by location and by date (“All locations” / “All selected dates”), and it updates almost in real time.
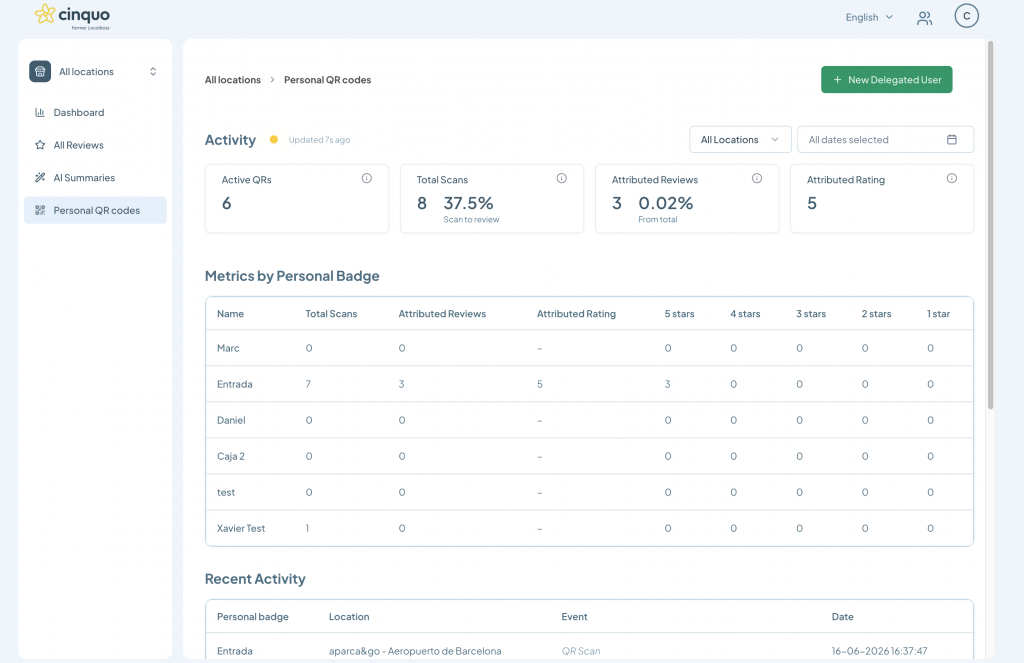
You’ll see four main indicators:
- Active QRs: how many QR codes you have running.
- Total Scans: number of scans and the scan-to-review conversion rate.
- Attributed Reviews: reviews generated directly from your QR codes and their share of the total.
- Attributed Rating: the average rating earned through the QR codes.
Below, the Metrics by Personal QR table breaks down, for each QR, the total scans, attributed reviews, rating, and the star distribution (from 5 to 1). This lets you compare performance across spots or across employees and see, for example, which entrance or which register converts best.
Finally, the Recent Activity section lists the latest events (Personal QR, location, event type, and date) so you can follow in real time which QR is being scanned and where.